Nothing beats a foam bug when it comes to topwater panfish flies. Foam offers many advantages over traditional material like hair, fur, and feathers when building a topwater bug for panfish. For starters, foam is very easy to work with. It is a durable and forgiving material that floats well and is available in a wide range of colors and thicknesses. Foam is also inexpensive and readily available.
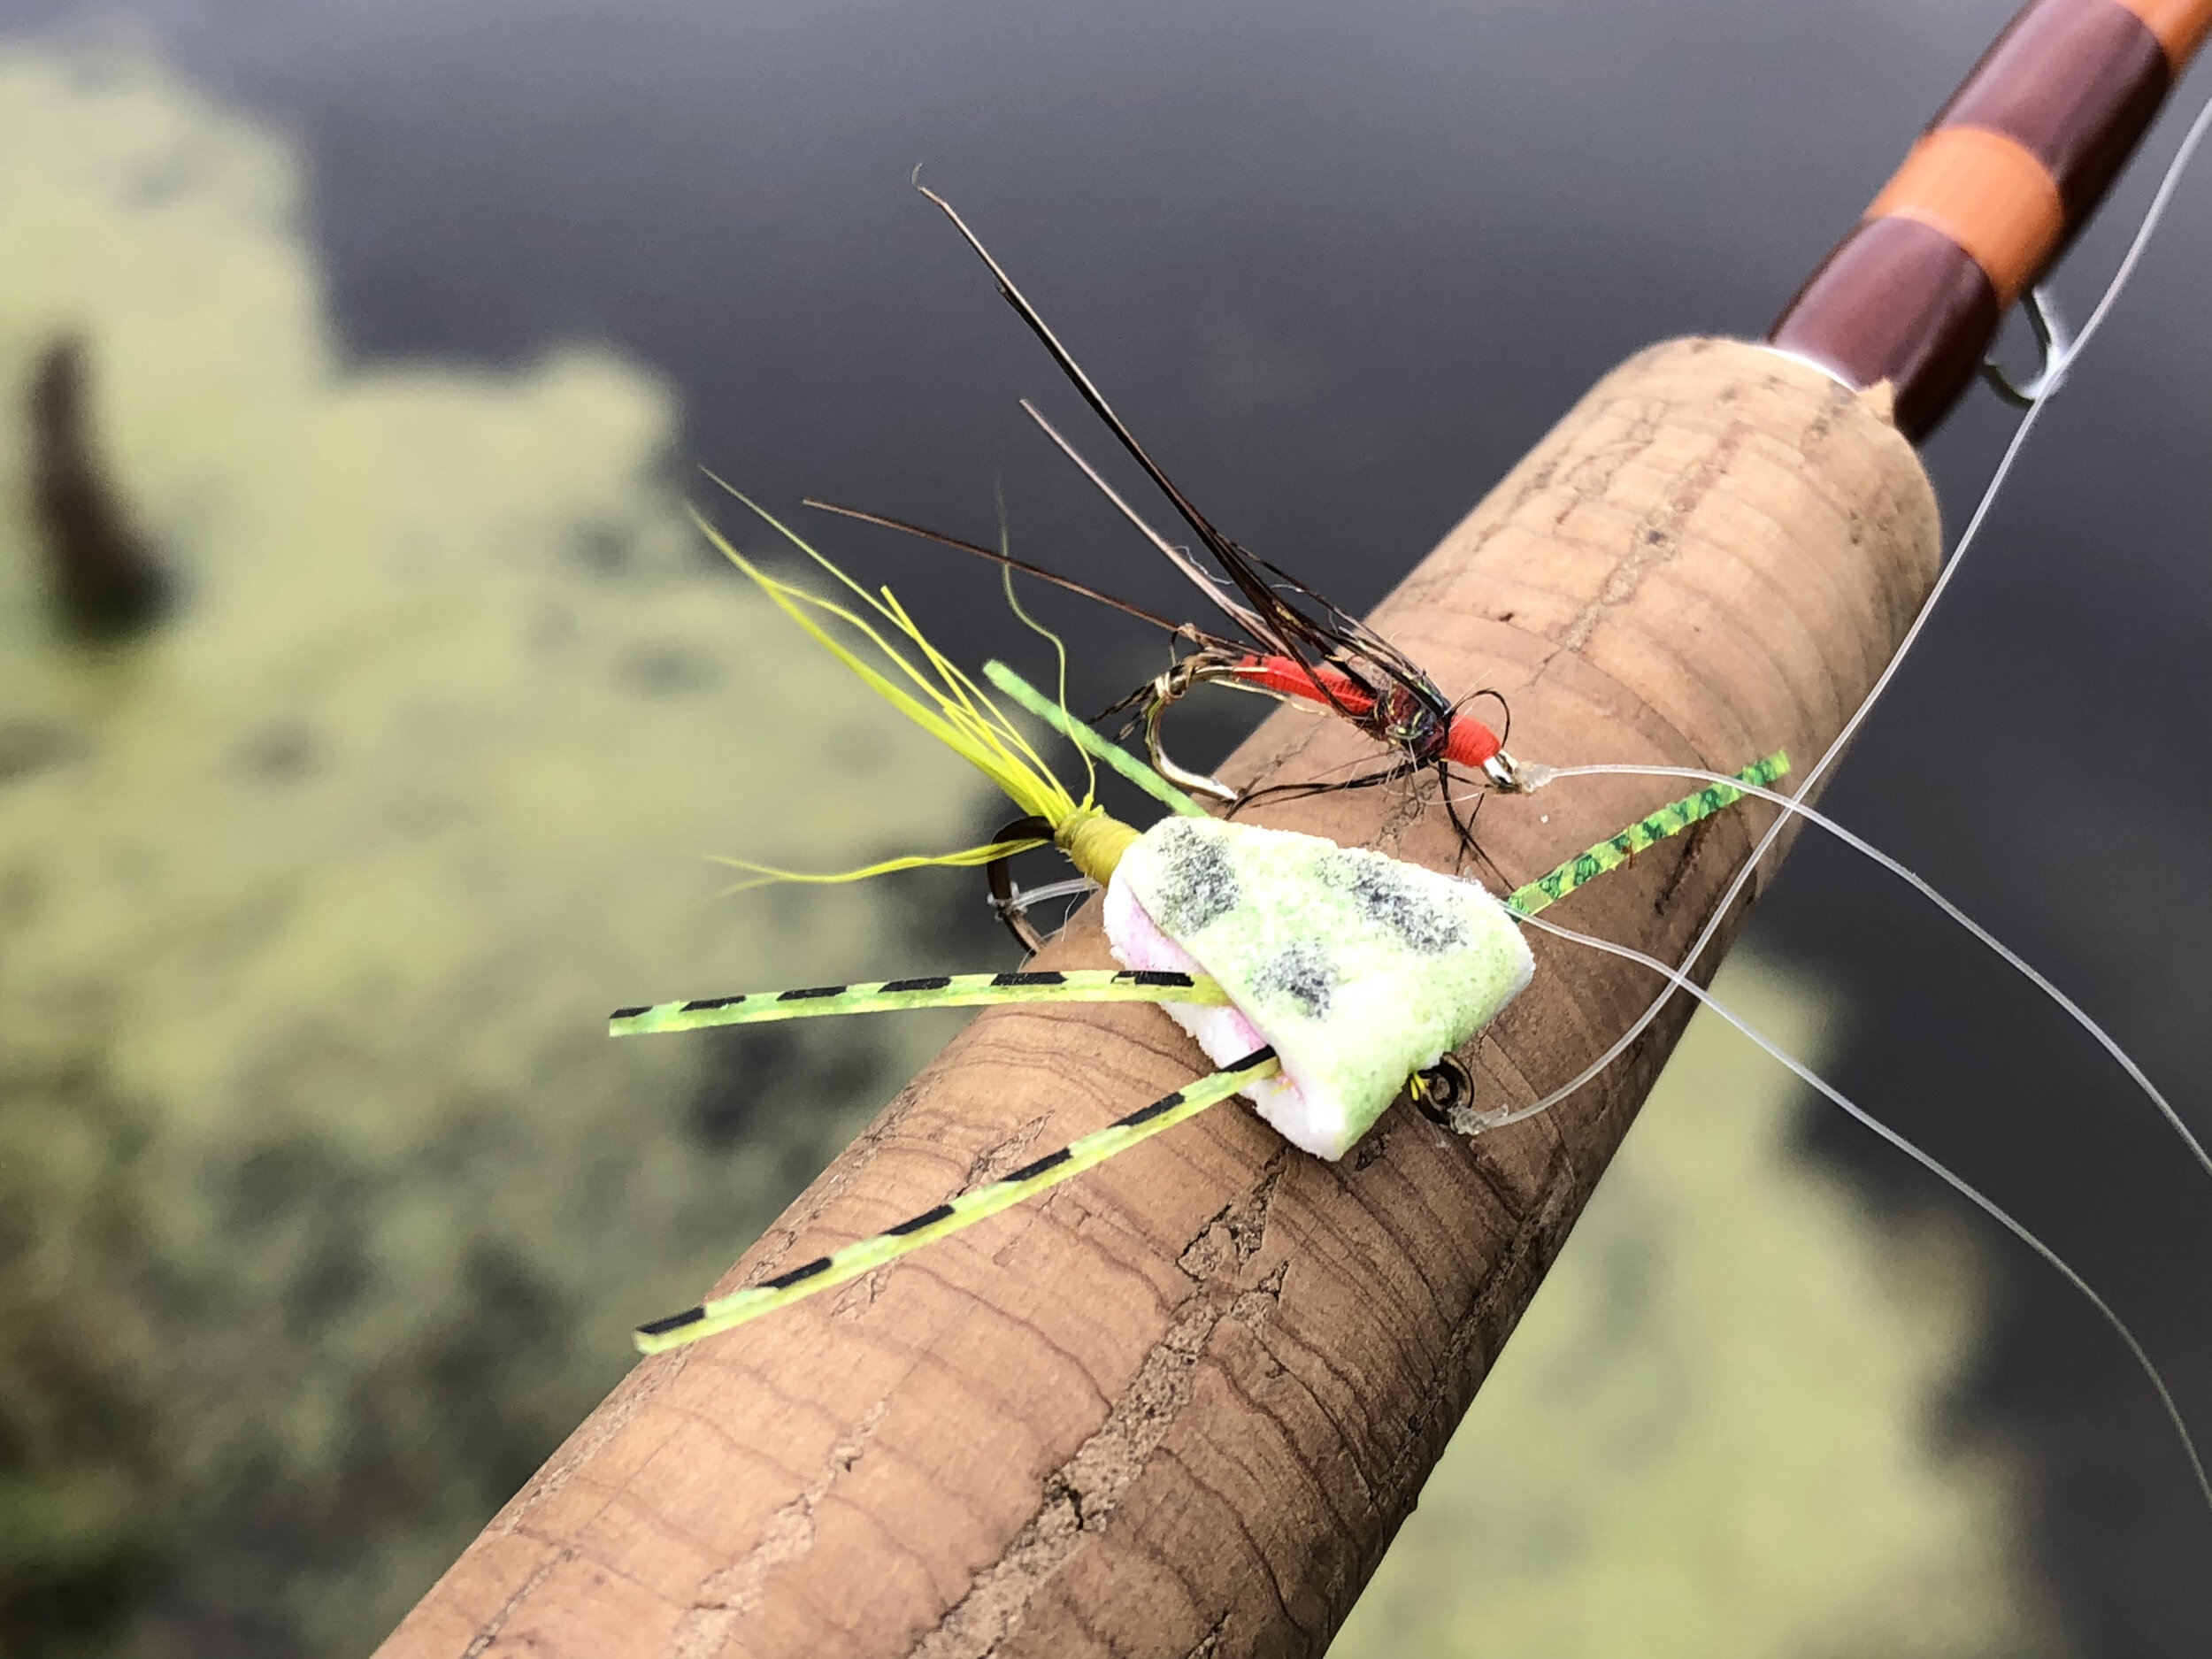
Nothing beats foam for durability. This foam Triangle Bug has caught over a hundred fish! Despite being well chewed and looking a little rough it is still going strong The accompanying soft hackle dropper had to be replaced numerous times. When the fishing gets hot it can be tough on flies!
When it comes to panfish flies, durability is a crucial feature you should build into every fly. Durability is where foam excels as a tying material. When the fishing is good, one could expect to catch dozens of fish on a single fly if it is constructed well. Although I love fishing deer hair bugs for panfish and bass, they can get waterlogged and chewed up pretty bad after a dozen fish or so. A similar foam pattern will be floating high and looking like new after twice that many fish!
I have dozens of favorite foam patterns that I tie and fish regularly. One versatile design that rises near the top of that list is Jack Harford’s House Fly. The House Fly is an easy to tie pattern that you can modify to imitate a wide range of topwater offerings. I recently adopted the pattern to develop a large foam bug to imitate a Brood X Cicada. These big black and orange bugs are supposed to appear in large numbers in my area this summer. So I am tying up a bunch of different patterns to imitate them.
Jack Harford’s House Fly is a pattern that should be in every warm water anglers fly box! He was kind enough to share an article and a video on how he ties this great pattern. I will let Jack take it from here in his own words.
House Fly by Jack Harford
A lot of folks are just looking for something simple to tie that will catch them a bunch of fish. The House Fly is one of those kinds of flies.
You know the ole 80/20 rule – like 20% of the people make 80% of the money. We all like that one, don’t we. And most likely, 20% of the fisherpeople catch 80% of the fish . . . and 20% of the flies catch 80% of the fish. Ok, maybe you see where I’m going. I want to tie and fish some of those 20 percenters. You probably have a couple of those flies too. I’d really like to see a picture of your 20 percenter fly and maybe a fish that it’s caught. The House Fly is one of those 20 percenter flies.
This is a simple, cheap, versatile, and very effective fly. In different sizes, it is a housefly, horsefly, cicada, grasshopper, mouse, or caddis fly. The possibilities are endless. It is more a style of tying than a single pattern.
The House Fly is particularly well suited for warmwater species and especially members of the Sunfish family, like largemouth, smallmouth, and rock bass, sunfish, bluegills, and redears. It has also been eaten by trout and crappies.
Here’s what it takes to tie one:
Hook – just about any will do, I like the Mustad 33903 Kink Shake Hooks, but 3366, popper hooks, curved nymph hooks, streamer hooks, dry fly hooks, you name it. Size – 1 or 2 for a mouse down to 16 for a quasi-caddis.
Craft Foam strips (Michaels, Wal-Mart, Joann’s) 2mm, 3mm, or two colors of 2mm with the sticky back and stick’em together for 4mm. One of my favorites is a 1mm yellow together on a 2mm Black sticky back foam sheet. Yellow, black, orange, blue, chartreuse, white, and tan are some of the colors that have been effective. The width of the foam depends on the size and shape of the fly.
Medium rubber legs or small for the tiny flies.
140 or 210 denier thread –red tends to add another attraction to the fly.
Upgrade it a little if you like with a hackle run through the segments of the fly.
Looking for materials?
This fly is the product of two other Jacks, it could be the Fly of 3 Jacks. Jack Scifers taught my first fly tying class at Flymasters, and the first fly he taught us was the foam spider. He loved that foam spider and sometimes would say it was the only fly you’ll ever need. Jack tied them commercially by the hundreds.
The second was Jack Gartside, an amazing, creative, fly tyer who tied flies one day at the old Royal River Fly Shop. The Gartside gurgler is still one of my favorite flies and it catches the attention of a lot of fish too. Gartside explained how to make the best use of foam, as well as telling a lot of entertaining stories. Check out www.jackgartside.com for more info on Jack, his books, and his flies.
The rubber legs from the spider + the floatability of the gurgler plus an inverted foam wing all add up to the easy to see, high floating, and wiggly house fly. Scores of fish have testified to its effectiveness by their willingness to eat one.
If you have questions or a hero photo of a fish that caught this fly you can email me at jharford2000@yahoo.com or find me on Facebook. Let me know if your club would like a presentation or class and we can see what we can work out. God Bless - - - Jack
The House Fly
Tying instructions from Jack himself:
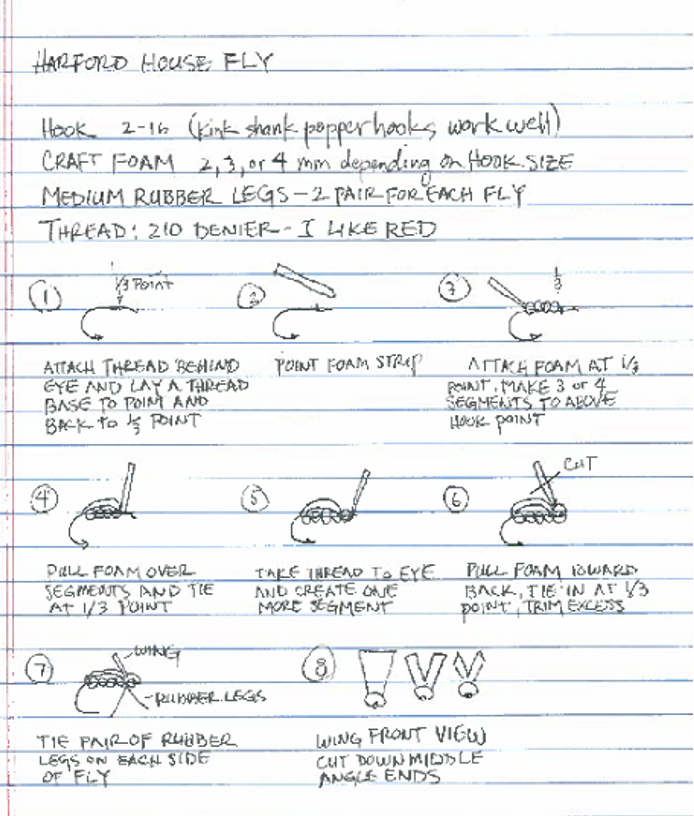
1. Clamp a size 8 Mustad kink shank hook (33903) in the vise and start the thread just behind the eye of the hook. Wind the thread back to the bend in tight wraps and then with spiral wraps back to about one-fourth of the shank length from the eye. We’ll call this the 1/4 Point.
2. Cut a 3mm foam strip 2.25” long and about 5/16” wide. Make a dull point on one end of the strip of foam and attach this end at the 1/4 Point.
3. Create 3 or 4 segments by making 5 or 6 wraps in the slot between segments as you tie down the foam progressing back to the bend of the hook. Squeeze the foam so it wraps around the hook for each segment. Make sure you transition to the next segment on the top side of the fly. Remember the fish only sees the bottom.
4. When the fly is segmented back to the hook bend, take the thread back to the 1/4 Point by wrapping on top of the segment on the top of the fly and in the segment division on the bottom of the fly. Try to keep the segments on the bottom of the fly as neat as possible; this is what the fish sees.
5. Pull the foam strip toward the front of the fly and tie down at the 1/4 Point with 5 or 6 thread wraps, then lift up the foam and take the thread to just behind the eye.
6. Lay the foam back down over the eye, pinch the foam just behind the eye and tie down with 5 or 6 wraps of thread to create the base for the head. Then take the thread back over the top of this newly created segment to the 1/4 point.
7. Pull the foam back toward the rear of the fly and with a little tension on the foam tie it down at the 1/4 point to create the wing. The tension on the foam helps create a nice round head for the fly.
8. The rubber legs come in a wide strip a couple of feet long. Cut off a 2” section and separate the legs in pairs. Attach one pair of round rubber legs at the 1/4 point to each side of the fly. Attaching the legs in the middle will give more of a spider look; if the legs are tied in longer in the back and shorter in the front it gives more of a hopper/cricket look.
9. With the bobbin needle or by hand, separate the legs so that there are 4 legs on each side.
10. Whip Finish or make a few half hitches to finish. Take the fly out of the vise and hold in the left hand with the fly facing away. With the scissors, make a cut down the middle of the wing and then trim each side of the wing at a 45 degree angle starting at the end of the inside of the wing and angling down to the outside of the wing.
11. Go fishing. This fly can be dead drifted in creeks, but giving it one inch strips sometimes makes the fish get crazy. Other times longer strips that make the fly dive followed by a pause will do the trick. Experiment and see what works for you.
Looking for materials for this pattern? We have it all, including individual Foam Sheets, Laminated Foam, Hooks, and Leg Material.
Visit the shop!


