Let me take a moment to introduce the fly tier who submitted this week’s pattern. Bill Ninke is a member of my local Trout Unlimited chapter and someone I have been associated with for many years. As a fly tier, Bill has forgotten more than I will ever learn on the topic. He taught fly tying in my TU Chapter when I joined the organization back in the early eighties. I never attended one of his beginner students in those early days, but I should have, as it would have indeed flattened out my learning curve. Instead, I took the hard way of figuring things out on my own. Since those early days, I have had many had opportunities to attend his advanced classes and always walked away learning something new. Today I have the pleasure of teaching alongside him, and he still manages to teach me something every time we sit down at the vice together! What follows is in Bill’s own words. Although he initially tied the fly for trout, we all know leeches are an important food source in our warm water rivers, lakes, and ponds. I am confident this one will be a killer for bass and panfish!
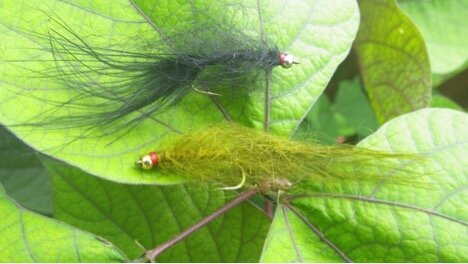
The Black Bead Head Hale Bopp Leech as tied by Bill Ninke
When questioned in classes and at tying demos as to what my two highest producing patterns are, the Parachute Adams and the Carlson’s Copper Cripple are at the top of the list.. But I’ve never had anyone ask on which pattern I have caught most of my big trout. Well, if anyone ever does ask, my answer will be this month’s pattern, the Black BH Hale Bopp Leech. It’s a still water fly and, as experienced fly fishers know, still waters hold the biggest fish. There is little current to fight in such water to sap energy. Trout just cruise slowly around, eat all the goodies present, and grow fat. And those goodies are mostly Mayfly, Dragon Fly and Damselfly nymphs, small fish and leeches.
This pattern was created by Derek Fergus, a California tier and guide, around 1996-7 when the Hale Bopp comet was visible from earth. If you look at the above photo you notice that with the bright bead head and long wispy tail the pattern resembles a comet. The construction is quite simple – a bead head, marabou tail, and mohair (African goat) body. Mohair, a seal substitute, is quite translucent. A thread finishing band behind the bead gives a little hot spot. You might say it’s just a mohair leech. But there are some subtle but important differences. First, the bead is one size smaller than traditionally used for the hook size. This gives the fly a gliding action like a real leech, not the heavy up and down jigging action of a Clouser minnow. The tail is extra-long and thin for lots of sinewy motion. And the body is very aggressively picked out so that the fly is almost translucent with the body fibers able to move freely as the fly is slowly stripped.
I was introduced to this fly around 2000 by Gary Fritz, one of the premier guides on the Missouri River. Gary died a few years ago but the important properties of the fly that he taught me will remain forever in my memory. The pattern is tied commercially by Solitude Flies. If you look at their version you’ll see a black bead. But Gary had them specially tied for him with a silver bead since he thought it fished slightly better. It’s Gary’s version I present here. Gary liked fishing the fly on a floating line with slow stripping and an occasionally pause. Certainly has worked for me.
When I first tied the pattern for myself I used mohair dubbing for the body. If you’ve ever tried dubbing mohair you’ve probably done a lot of swearing. It’s very slippery and hard to control. In recent years I’ve gone to using Mohair Yarn from J Fair. Other mohair yarns will probably work but I haven’t tried them. The yarn is simply tied in and wrapped under high tension with the yarn fibers pulled back with each wrap. No bad words come from my mouth when using the yarn. Then the body is picked out. The key is to use a strongly hook, like that on the tip of a Materelli style whip finisher, to pull fibers out and create a halo like body. I typically spend more time picking out the body than I spend tying the fly.
Although I mostly tie and fish a black version, I also occasionally use an olive one. A copper bead is used on this version. I’ve included an olive one in the photo. I also tie versions without a bead on size 10 hooks in both colors.
Water temperatures are starting to decrease. Trout will be packing in calories to maintain themselves for the Winter. So from now through October is prime time to use this pattern. You’re sure to get lots of “pops” in still water on your Bopps.
Material List:
Hook: Daiichi 1260, TMC 200R or similar curved shank hook in size (a TMC 2312 used in fly in the photo)
Bead: 1/8 inch Silver Tungsten
Thread: Red Danville 6/0
Tail: Long strands from a premium black Marabou plume
Body: J. Fair Black Mohair Yarn
Tying Instructions:
1. Mount bead on de-barbed hook and place hook in vise.
2. Attach thread to hook slightly behind the bead, wrap back to the bend and then back to starting point. Trim thread tag.
2. Tear off about 20 strands from marabou plume.
3. Tie in with tips of strands pointing rearward so tips extend two shank lengths behind fly. Overwrap with thread back to the bend. Trim forward marabou.
4. Tie in mohair yarn tag end rearward.
5. Wrap yarn forward behind thread under high tension to bead. Tie yarn off securely and trim yarn tag.
6. Form a small thread band behind bead, whip finish, trim thread
7. Apply head cement to thread band.


